- Автоматизация
- Антропология
- Археология
- Архитектура
- Биология
- Ботаника
- Бухгалтерия
- Военная наука
- Генетика
- География
- Геология
- Демография
- Деревообработка
- Журналистика
- Зоология
- Изобретательство
- Информатика
- Искусство
- История
- Кинематография
- Компьютеризация
- Косметика
- Кулинария
- Культура
- Лексикология
- Лингвистика
- Литература
- Логика
- Маркетинг
- Математика
- Материаловедение
- Медицина
- Менеджмент
- Металлургия
- Метрология
- Механика
- Музыка
- Науковедение
- Образование
- Охрана Труда
- Педагогика
- Полиграфия
- Политология
- Право
- Предпринимательство
- Приборостроение
- Программирование
- Производство
- Промышленность
- Психология
- Радиосвязь
- Религия
- Риторика
- Социология
- Спорт
- Стандартизация
- Статистика
- Строительство
- Технологии
- Торговля
- Транспорт
- Фармакология
- Физика
- Физиология
- Философия
- Финансы
- Химия
- Хозяйство
- Черчение
- Экология
- Экономика
- Электроника
- Электротехника
- Энергетика
Conclusion
MINISTRY OF EDUCATION AND SCIENCE OF RUSSIAN FEDERATION
Federal State Autonomous Educational Institution of Higher Education
«V. I. VERNADSKY CRIMEAN FEDERAL UNIVERSITY»
Medical Academy named after S. I. Georgievsky (structural subdivision)
ABSTRACT
SUBJECT: Inspection and external examination of Pregnant woman
STUDENT :Bhatt Mauly Sandipkumar
Faculty : IMF
course : 4th
group : La-1-173(2)
NAME OF PRACTICE:___ Gynecology and obs. Department
SPECIALIZED ORGANIZATION__
CITY (urban village): Simferopol
DURATION OF PRACTICE: from 5/7/2021 till 18/7/2021
Simferopol, 2021
Introduction
SYSTEMATIC ASSESSMENT
The maternal condition can affect fetal status. Therefore, it is critical to systematically gather maternal information prior to interpretation of the fetal heart rate (FHR) pattern. Obtain a complete prenatal record and review it for the pelvic type and adequacy. Read the last prenatal visit data, and determine the recorded fundal height and maternal weight. Read the ultrasound (US) reports that might include clues of the potential for cephalopelvic disproportion or an increased risk of a cesarean section or shoulder dystocia (see Section 11 for more information). If the prenatal record is not complete, obtain additional information by interviewing the patient.
The choice of monitoring methods depends on the practitioner’s orders, the institution’s policies and procedures, and patient requests or needs. Before approaching the patient, you should know whether auscultation and palpation are going to be the only monitoring methods and whether fetal monitoring will be intermittent, continuous, or a combination of both auscultation and electronic fetal monitoring.
Use a systematic approach to evaluate the pregnant woman and her fetus or fetuses. Apply the fetal monitor to complete your assessment. You may choose to do all or part of this assessment prior to monitor use.
Initial Maternal/Fetal Assessment
- Review the prenatal record.
- Assess maternal vital signs, including pain.
- Determine risk factors, including diabetes (D), obesity (O), postdates gestation (P), excessive maternal weight gain and fetal macrosomia (E), and maternal short stature (S). These factors significantly increase the risk of a cesarean section related to cephalopelvic disproportion and shoulder dystocia.
Part of the maternal head-to-toe assessment should include:
- Leopold maneuvers to locate the fetal back, determine fetal position, and estimate the fetal weight
- Determination of the presenting part(s)
- Confirmation of fetal life: palpate fetal movement (FM) and/or hear fetal heart sounds with a fetoscope, stethoscope, or Pinard horn
- Determination of the fundal height
- Examination of the cervix, fetal station, and presenting part (if there are no contraindications such as vaginal bleeding)
- Evaluation of the status of the membranes (ruptured or intact)
- Evaluation of vaginal bleeding versus bloody show and any vaginal discharge
- Determination of normal versus abnormal uterine activity (see Sections 5 and 6 for more information)
- Determination of the presence or absence of labor
LEOPOLD MANEUVERS
Preparation
Place the woman on her back in a semi-Fowler’s position with her legs flexed. You may place a pillow under her hip to displace the uterus off the inferior vena cava and aorta. Ask her to breathe slowly, and inform her that you will push gently and she may feel pressure but not discomfort.
Inspect and palpate the maternal abdomen to determine fetal lie, size, presentation, and position and for the contour and shape of the abdomen. The second maneuver will help you locate the fetal back for external US transducer placement.
First Maneuver: What Is in the Fundus?
Stand at the woman’s side and palpate the fundus using both hands. What is in the fundus?
First maneuver: ldentify what is in the fundus.
- The head feels hard and moves when you push against it.
- The buttocks should palpate as a shape that is soft and round.
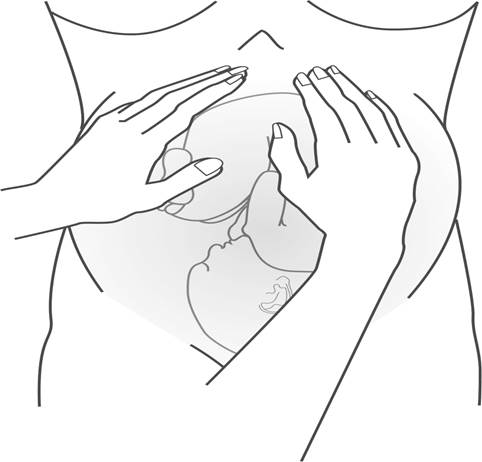
Second Maneuver: Where Is the Fetal Back?
Face the woman, and place your hands on either side of her abdomen. While holding one hand still, push on the fetus and feel for the arms and legs and the curve of the fetal back. Now hold the opposite hand still while pushing with the other hand. Can you feel the fetal back? Did the fetus move? You can document FM as FM palpated or FM +. It is very important to keep one hand still so that if the fetus has died you do not mistake pushing the fetus toward the other hand as FM.
Second maneuver: Find the fetal back.
- The back feels firm, curved, and smooth.
- The legs, feet, arms, and hands feel irregular.
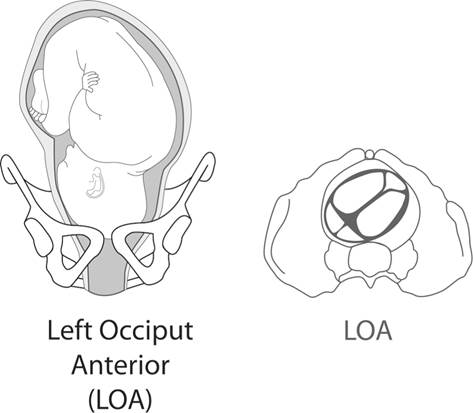
Once you have located the fetal back, the fetal part in the fundus, and the presenting part, you should be able to determine the fetal position. If the back of the baby is on the maternal left (L) side, the occiput (O) is also on the left. The baby will be LOA, LOP, or LOT. The A means anterior, P means posterior, and T means transverse in relation to the maternal pelvis. LOP and LOT are malpositions.
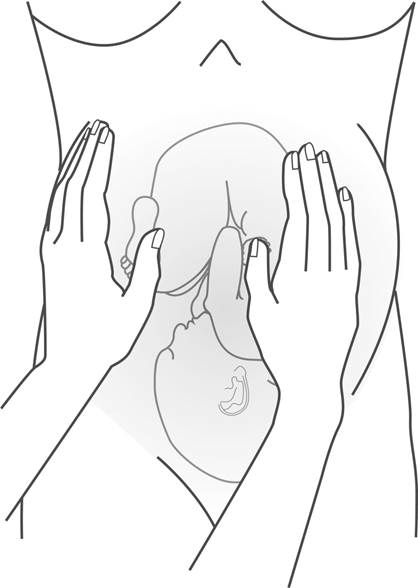
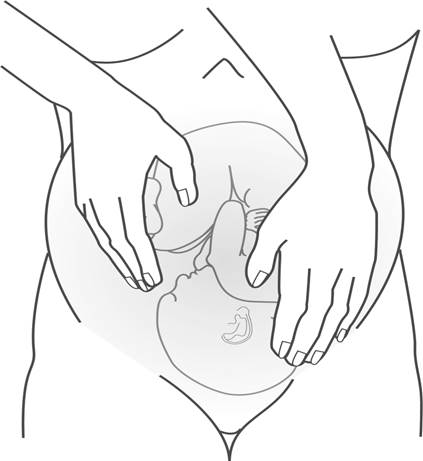
Third Maneuver: What Is the Presenting Part?
With your dominant hand, grasp the lower uterine segment by pushing in above the pubic bone .Palpate for a hard or soft mass. If in doubt, a vaginal examination may be helpful to confirm the fetal presenting part and fetal position .
Face the woman’s feet and slide your hands down the sides of her uterus until your fingers on one hand first meet resistance. This is the cephalic prominence. It may be the baby’s forehead or back of the head. If the cephalic prominence is opposite the baby’s back, the head is flexed. This is what you want to find. If the occiput is the cephalic prominence, the baby’s head is in extension, which can impede fetal descent. In , the fetal forehead is the cephalic prominence.
1.3
Third maneuver: Find the presenting part.
- The fetal buttocks should palpate as a shape that is soft and round.
- The head feels hard and round.
1.4
This baby is in a left occiput anterior position.
The back of the fetal head is at the top and to the left side of the pelvis.
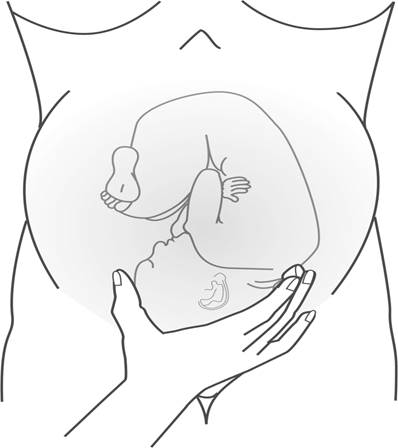
Fourth Maneuver: Where Is the Cephalic Prominence?
When the fetal head is the presenting part, the fourth maneuver will help you identify the cephalic prominence (Figure 1.5).
1.5
Fourth maneuver: Feel the cephalic prominence.
ESTIMATE THE FETAL WEIGHT AND PALPATE FM
Estimate the Fetal Weight or Size and Palpate FM
When doing Leopold maneuvers, estimate the fetal weight and fetal size. One way to practice estimating fetal weight is to close your eyes while palpating a 4, 5, and 10 lb (1.8, 2.3, and 4.5 kg) sack of sugar that is flat on a table. Feel the difference in the density of the bags. Note the difference between the 4 and 5 lb (1.8 and 2.3 kg) bags. Is the fetus more like the 5 or 10 lb (2.3 or 4.5 kg) sack of sugar? As you become more comfortable in estimating fetal weight, it may become easier to predict how well the fetus will fit through the pelvis. Review the maternal obstetric record for the type of maternal pelvis. A gynecoid pelvis has more room than an android pelvis. Does the fundal height suggest a large or small baby? Estimation of fetal weight is important. The risks of fetal macrosomia and fetopelvic (cephalopelvic) disproportion and shoulder dystocia increase when the mother has diabetes and/or an excessive weight gain during pregnancy. If you have not yet assessed FM, gently place your hand on the maternal abdomen to feel for spontaneous FM.
EVAULATE THE FHR BY AUSCULTATION
Before you apply technology such as the electronic fetal monitor (EFM), confirm fetal life. Fetal life can be confirmed by auscultating fetal heart tones (FHTs) with a fetoscope, stethoscope, or Pinard horn prior to application of the US transducer. Auscultation may be used to intermittently monitor the FHR upon admission of a woman with no risk factors for fetal hypoxia or ischemia. Auscultation prior to application of the fetal monitor is desired, especially when there may be a fetal demise. Auscultation of fetal heart sounds or tones occurs when a fetoscope, stethoscope, or Pinard horn is used. Hearing the actual sounds from the fetal heart valves, not the sounds from the EFM’s audio output, confirms fetal life and can be used to calculate the FHR.
The fetoscope, stethoscope, Pinard horn, or Doppler needs to be placed over the fetal back near the baby’s head. Listen for at least 30 seconds following a contraction to detect any decrease in the FHR. Continue to listen and record a rate every 6 seconds for a full minute. This makes increases and decreases in the FHR easier to detect. Count and record the rate over a 6-second period of time for 10 consecutive times (60 seconds). Add a zero to each 6-second rate to calculate the beats-per-minute (bpm) rates. For example, if you count the first five rates for 6 seconds each and record 10, 11, 12, 11, and 10, the FHR in bpm will be 100, 110, 120, 110, and 100, respectively. Continue counting for a full minute or longer. In a term or postterm fetus, 100 to 110 bpm is in the normal baseline range. However, it may not be normal for the fetus. It is best to determine the fetal norm based on data collected during prenatal care.
A Doppler device is similar to the US transducer of the EFM. The Doppler (US) device is only a motion detector, not a sound detector. If you use a handheld Doppler device and not an auscultation device (fetoscope, stethoscope, or Pinard horn), it is best to simultaneously palpate the maternal radial pulse to differentiate it from the heart rate obtained with the Doppler device. The Doppler device can be used to determine a heart rate, but it can mislead you to think that the fetus is alive when you are actually hearing the maternal heart rate (MHR) and the fetus is not alive. Therefore, to avoid this error, palpate the maternal radial pulse while you listen to the Doppler sounds. Is there a distinct and wide difference in the two rates?
Before you assess the FHR, review the prenatal record for any recorded FHRs. If you have nonstress test tracings from the pregnancy, you can also review the FHR, which is the normal baseline for the baby. The FHR drops approximately 0.5 bpm per week every week of gestation beginning at 12 weeks. The FHR level stabilizes at 35 weeks of gestation.
Record both the MHR and the FHR.
CONFIRM FETAL LIFE
Do not apply the fetal monitor’s US transducer until you are sure the fetus is alive. Otherwise, the printout will be 100% maternal and could be mistaken as a FHR. Section 4 covers MHR patterns. The woman’s heart rate or doubling of her heart rate can appear on the fetal monitor paper or the computer monitor. Sometimes the MHR doubles because the monitor’s software analysis counts the systole and diastole related to the movement of the maternal aorta as two separate beats (Figure 1.6).
1.6
MHR near 87 bpm and machine doubling and printing near 174 bpm.
The fetus was dead. The nurse did not confirm fetal life prior to application of the fetal monitor. The lack of fetal heart motion was confirmed by real-time US.
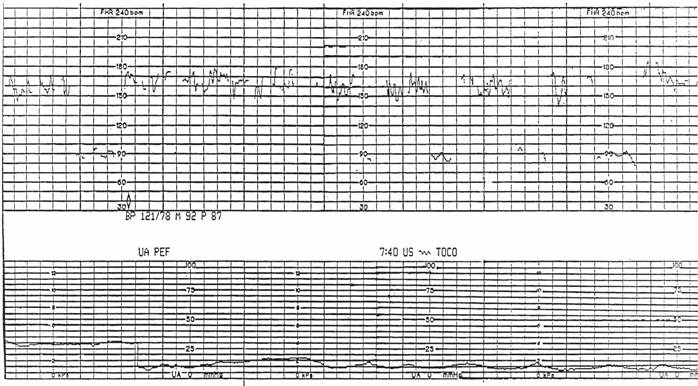
By listening to actual fetal heart sounds with a fetoscope, stethoscope, or Pinard horn prior to application of the EFM, you can avoid mistaking the MHR for the FHR.
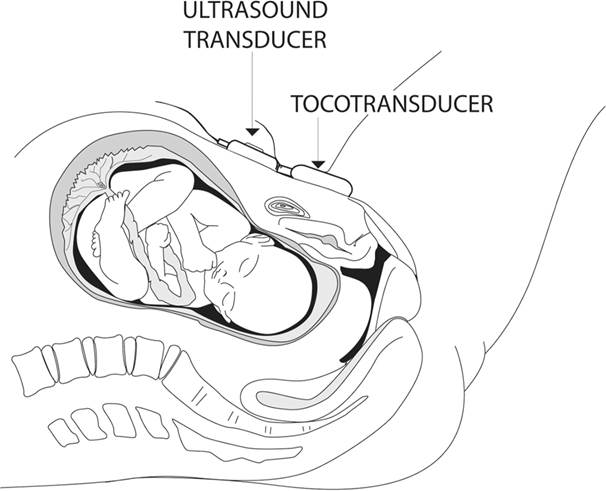
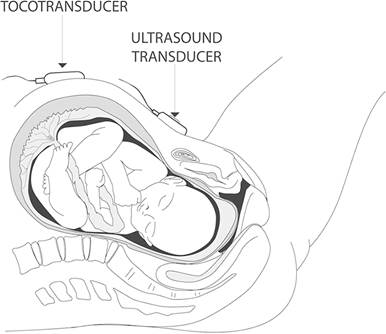
APPLY THE MONITOR
To apply the external US transducer, place the belt under the woman’s back. Locate the fetal back. Apply US transmission gel to the transducer so that the gel is between the US transducer and the maternal abdomen. Place the transducer over the fetal back. If you have difficulty finding the FHR, move the US device slightly to the left or right or use the second Leopold maneuver again to locate the fetal back (Figure 1.7).
1.7
In this photograph, the US transducer is placed on the maternal left, over the baby’s back and below the umbilicus.
Courtesy of Philips Healthcare.
Here are some facts about the first hospital-based external wireless fetal ECG (fECG), maternal ECG (mECG), and maternal uterine electromyography (EMG) monitor:
- Research and development of the Novii® noninvasive wireless fECG, mECG, and maternal uterine EMG monitor occurred at Nottingham University in the United Kingdom.
- Monica Healthcare was established in 2005 to produce the first hospital-based external wireless fECG, mECG, and maternal uterine EMG monitor.
- The first generation Monica AN24/IF24, a precursor to the Novii Wireless Patch System, was introduced to the U.S. market in 2011 after receiving Food and Drug Administration (FDA) approval for use on women with singleton pregnancy, in labor, and at full-term gestation (at least 37 weeks).
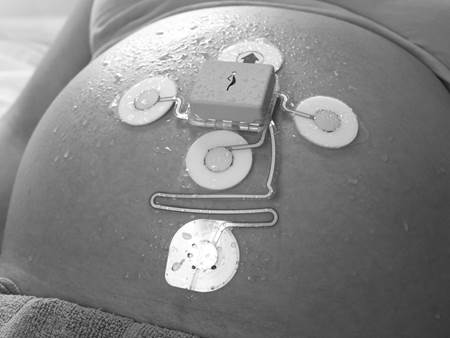
The Novii utilizes Bluetooth technology to communicate acquired signals from electrodes that work in pairs to create channels that acquire the fECG, mECG, and uterine EMG signals. The Novii Interface is connected, via cables, to the front panel of the traditional fetal monitor, to record the trace, and then on to the central station monitor display and archival system. The monitoring software of the Novii Pod recognizes both the maternal and fECG waveforms and then it calculates the heart rates using the R–R interval (Figure 1.8).
1.8
Novii monitoring of uterine activity.
The Novii Patch incorporates ECG electrodes that pick up ECG and EMG signals from the skin surface and transfers them to the Novii Pod (shown here attached to the patch). The Novii Patch, when worn with the Novii Pod, is waterproof.
Courtesy of GE Healthcare.
The fetal R-wave amplitude of the fECG is distinctly different from the maternal R-wave amplitude and mECG shape, which increases recognition of the FHR. The Novii uses three electrode channels to capture the fECG and mECG, and two electrode channels to capture the uterine EMG, avoiding the need for readjustment.
Since adipose tissue does not inhibit transmission of these electrical signals, FHR and uterine activity (UA) monitoring performance with Novii is not compromised by a high maternal body mass index (BMI), which diminishes the need for an invasive fetal spiral electrode to capture the fECG or an intrauterine pressure catheter (IUPC).
The Monica Novii Wireless Patch System is an intrapartum maternal/fetal monitor that noninvasively measures and displays FHR, MHR, and uterine activity. The Novii Patch (on the right in is a single-use, peel-and-stick disposable patch. The Novii Interface (on the left in ) translates Bluetooth data transmitted by the Novii Pod.
1.9
Monica Novii Wireless Patch System.
Courtesy of GE Healthcare.
ad
A single-use patch with a semifixed array of high-quality electrodes will be centered over the uterus (see patch in 1.9). Current Bluetooth range for the Novii for women who are ambulating is up to 100 ft (30 m) away from the bedside monitor.
The Novii Patch is adhered to the maternal abdomen after the maternal skin is prepped to remove superficial dead skin to decrease resistance or impedance of the fetal and maternal electrical signals at the sites of the individual electrodes.
Adjustments may be needed depending on uterine size, maternal umbilicus (navel) location, and pannus size. Both the top of the fundus and the top rim of the pubic bone are important landmarks for determining proper patch/electrode positioning. The Novii Pod contains the monitoring software and a rechargeable battery and attaches magnetically to the Novii Electrode Patch.
ECG AND EMG SIGNALS
The electrodes work in pairs to create channels that acquire the fECG, mECG, and uterine EMG signals. The monitoring software recognizes both the mECG and fECG waveforms, and then calculates the heart rates using the R–R interval.
Previously, the only option to monitor very high BMI women like this would be through invasive scalp fECG and IUPC. Although this technology is very valuable and works very well on most women, the Monica Novii cannot successfully monitor every FHR continuously. The fECG signal is very small, and therefore other electrophysiological signals from the woman’s body can be larger or “louder,” preventing the Novii from being able to identify and trace the fECG well. This interference is referred to as electrical noise. The fECG signal quality must be greater than the noise so that the Novii can provide enough data for a continuous FHR tracing.
ELECTROMYOGRAPHY
EMG relies on detection of electrical activity from the uterine muscle. The Novii software sends the raw EMG signal to the EFM computer where waveforms are then produced as a bell-shaped uterine activity image. Since these images are not generated based on pressure transmitted via a tocotransducer (TOCO), it must never be the sole determinate of contraction duration, contraction strength, or resting interval. Assessment of the UA image acquired using EMG technology should be used in combination with palpation.
Using the Novii on women in the latent phase of labor or at the onset of an induction may result in uterine activity patterns that appear as uterine irritability (low-amplitude high-frequency waves), which may be perceived by the woman or palpated by the care provider. When this type of uterine activity (which may be artifact) is identified, a low-sensitivity setting may be enabled on the Novii to filter out low-amplitude contractions.
After labor is established, the low-sensitivity setting should be disabled to produce a more accurate UA trace. As labor continues, the uterine myocyte electrical activity should be synchronous and organized, resulting in an effective and reliable EMG method for monitoring contractions.
Advantages of the EMG monitor:
- Improved monitoring of high BMI women
- Choice for women who desired the wireless, beltless technology
- Increased mobility during labor
Limitations of the EMG monitor:
- It should not be used with patients who have a cardiac defibrillator or pacemaker.
- It should not be used with patients who are using a transcutaneous electrical nerve stimulation (TENS) unit.
- It provides no information on contraction strength.
- Uterine contraction waveforms may vary from those produced when a TOCO or IUPC is in use.
- The same contraction duration may vary with five different monitoring methods (laboring woman’s reported perception, care provider’s palpation, TOCO, IUPC, and EMG).
DETERMINE THE PRESENCE OF FETAL WELL-BEING
The presence of a stable FHR baseline with an acceleration that lasts at least 10 seconds at its base and rises at least 10 bpm (within the first 20–30 minutes of monitoring known as the admission test strip) and the absence of decelerations suggest fetal well-being and an intact brainstem–autonomic nervous system–cardiac connection. The acceleration is associated with a fetal pH of 7.19 or greater. However, there can still be fetal hypoxia and/or ischemia when there is a normal pH and that is why it is important that there are no decelerations.
A heart rate that increases and decreases may be heard when a fetoscope, stethoscope, or Pinard horn is used, but it is difficult to be sure there are accelerations and one cannot identify the type of decelerations that are heard. It is impossible to identify variability with the ear. Therefore, communication of auditory findings to the midwife or physician about changes in the maternal or fetal status will be less complete than discussion of FHR images or contraction frequency, duration, strength, and duration of resting interval. Any findings that are inconsistent with fetal well-being should be promptly reported.
Auscultation may be used during labor when a one-to-one nurse-to-patient ratio is feasible and there are no maternal or fetal risks that would impair fetal oxygenation. When the fetal monitor is used, documentation should include the presence of accelerations, the absence or presence of decelerations, and the FHR between accelerations and decelerations. When auscultation is used, you might mention no decreases in the FHR. However, decelerations are best identified visually on the fetal monitor printout. Also, document any FM you palpate or that is described by the patient or reported—for example, “fetus active per pt., FM palpated”
AUSCULTATION: ABNORMAL FINDINGS
A FHR greater than 160 bpm, less than 120 bpm if the fetus is preterm, less than 100 bpm if the fetus is term or postterm, or an irregular rhythm should be reported to the midwife or physician. Also, report any FHR that is greater than 20 bpm above or below the baby’s expected rate based on previous monitoring or the prenatal record. Apply the EFM if you hear a rate greater than 160 bpm, less than 100 bpm in a term or postterm pregnancy, less than 120 bpm in a preterm pregnancy, or if you hear an irregular rhythm.
ASSESS MATERNAL VITAL SIGNS AND RISK FACTORS
Take the woman’s blood pressure (BP) and pulse. The cuff must be an appropriate size and should be approximately 20% wider than the width of her arm. The woman should have her BP taken in a semi-Fowler’s or side-lying position versus supine. It is best to take BP between contractions because BP rises during contractions. Compare the readings with the woman’s baseline BP on her prenatal record. If the BP is elevated, pay special attention to her pulse, urine protein, edema, and reflexes. Also assess visual disturbances, headache, and epigastric pain. Could she have preeclampsia? Is she in pain? Describe the location, level, and characteristics of her pain in your notes.
RESPIRATORY RATE
Assess maternal respirations. Are they rapid and labored? Quiet and slow? An unusually fast rate (more than 24 per minute) may suggest anxiety with hyperventilation or a compromised respiratory system, requiring further assessment of the woman’s pulmonary or hemodynamic status and her temperature.
TEMPERATURE
If the woman’s temperature is elevated, look for signs of infection such as skin that is warm to the touch, foul-smelling vaginal discharge, a tender uterus, fetal tachycardia (more than 160 bpm), and/or maternal tachycardia (more than 100 bpm). Assess skin turgor, mucous membranes, and lips for dryness. If she is febrile, she may also be dehydrated. Assess her urine for ketones and, if possible, the specific gravity. When the pregnant woman is overheated, or there is a fever, the fetus is even warmer and is consuming oxygen and is at risk for deterioration. Review the oxygen–hemoglobin dissociation curve and the right shift that occurs when the temperature rises.
An increase in fetal temperature hastens fetal decompensation if there is a decrease in delivery of oxygen to the fetus. When the fetus is overheated, oxygen is released faster from red blood cells. Therefore, regular assessments of maternal temperature are critical during labor.
PERFORM A MATERNAL HEAD-TO-TOE ASSESSMENT
| FINDINGS | |
| HEENT (head, eyes, ears, nose, and throat) | Headache, blurred vision, tinnitus, nasal congestion, airway, dizziness? |
| Heart | Regular rate and rhythm, murmur, chest pain palpitations? |
| Lungs | Clear breath sounds bilaterally, unlabored respirations? Absence of wheezing, grunting, adventitious sounds? |
| Abdomen | Tenderness, pain, rigidity, distention, heartburn? Quality and quantity of contractions? Fetal movement? Round contour? |
| Extremities | Edema, reflexes, clonus? Homan’s sign? |
| Genitourinary | Urine protein, ketones, glucose, blood? Genital vesicles or warts? Rupture of membranes? |
COMPLETING THE ASSESSMENT
Inspection, palpation, and auscultation are used to complete your initial maternal assessment. Observe the woman’s general appearance and body language, which provide clues of underlying physical or psychological problems. Ask when she last ate and what she ate. Assess her herb and caffeine intake. When she is alone, ask whether she has been hit, slapped, kicked, or punched any time during this pregnancy. Ascertain whether she has had any bleeding problems, a history of previous hemorrhage with birth, or blood transfusions. This may prepare you for the possibility of a postpartum hemorrhage or a newborn with hemolysis as a result of an antibody–antigen reaction related to a past transfusion. Record your findings. Ask her to urinate prior to her cervical examination. A sterile speculum examination (SSE) may be done by a skilled member of the healthcare team when membranes are thought to be ruptured or the woman complains of trickling of fluid or leaking. The SSE is done to limit the risk of ascending infection.
DETERMINE FUNDAL HEIGHT AND FETAL GROWTH
What is the estimated date of delivery? If fundal height has not been measured in the last week or you are concerned that the placenta may be separating from the uterine wall (abruption), measure the fundal height by placing a tape measure at the top of the symphysis pubis and stretching it to the top of the uterine fundus. Mark the top of the fundus—use a ballpoint pen to mark the woman’s abdomen if you plan to measure and compare findings later.
After the 20th week of pregnancy, the fundal height is similar to the weeks of gestation. If there is a difference of 3 or more centimeters (cm) (e.g., if she is 26 weeks of gestation but the fundal height is 23 or 29 cm), an US may be done to identify a fetus who may be too small or too large and to identify the amniotic fluid volume.
When the fundal height is smaller than expected (not within 3 cm of the gestational age), review the prenatal history for persistent vomiting, poor weight gain, hypertension, street drug use, and smoking. These factors could diminish oxygen and nutrient delivery to the uterus, which would impact fetal growth.
Hydramnios, macrosomia, a uterine fibroid, and gestational diabetes may be associated with a larger-than-expected fundal height. Oligohydramnios and intrauterine growth restriction are associated with a smaller-than-expected fundal height.
DETERMINE UTERINE ACTIVITY
Palpate the woman’s abdomen, and feel the hardness of the uterus. Assess the symmetry of the abdomen during contractions. During normal labor, the uterine contraction at the fundus causes it to move forward, where it can be palpated. Feel your cheek. It is indentable. That’s how a mild contraction feels. Feel your nose. A little harder, but slightly indentable is how a moderate contraction feels. Feel your forehead. This is how a firm or strong contraction feels to palpation. Record a descriptive word such as mild, moderate, or strong to describe the hardness of the uterine fundus you palpate through the abdominal wall. If some contractions are mild and others are moderate, you might record “UCs mild-mod” or “ctx mild-mod” or choose more than one descriptive word on the electronic medical record (EMR). The duration of the resting interval is very important. Documentation of “soft” or “firm” to describe the uterine relaxation between contractions is inaccurate and misleading, especially if the duration of the resting interval is too short to allow fetal reperfusion and oxygenation.
DETERMINE THE PRESENCE OF LABOR AND STATUS OF THE MEMBRANES
Labor is defined as regular uterine contractions accompanied by a change in dilatation of the cervix. Labor progress is labor plus fetal descent. Determine the presence of contractions. Evaluate maternal pain by observing the woman’s face, hands, and toes. Is she curling her toes or tightening her grasp? Perhaps she is focused inwardly, suggesting advanced labor progress. Is her pain response what you would anticipate with the contractions you palpate? What impact does her culture have on her display of pain? Testing methods to confirm rupture of the membranes may include nitrazine paper with:
- A qualitative immunochromatographic test and a monoclonal antibody test (AmniSure®)
- A test that is a monoclonal/polyclonal antibody test that also detects alpha-fetoprotein and insulin-like growth factor-binding protein 1 (ROM Plus®), and/or
- A Fern test
If membranes are ruptured, record the color, amount, and odor of the fluid (1 mL of fluid weighs 1 g). Determine whether there is meconium, a vaginal discharge, or foul odor. The color and consistency of meconium should be recorded. The quantity of vaginal bleeding should be documented (it is distinctly different than blood show, which is mostly mucus with streaks of blood). The color and odor of a vaginal discharge should also be documented. The odor may be recorded as “foul” or “not foul.”
Before applying the fetal monitor:
- Assess comfort and assess pain, readiness to learn, and previous experiences with the fetal monitor.
- Address concerns about the EFM, and explain the monitor’s function and plans for use.
- Adapt the monitoring belts or use a soft abdominal binder if needed for the obese patient (e.g., attach one belt to another one). Avoid handholding the US transducer, because if it is held for a prolonged period of time, there is an increased risk of injury to the person holding the transducer.
- Do not use the US transducer or spiral electrode if the fetus is not viable (≤23 weeks of gestation) or has died.
- Do not apply the monitor if the woman refuses it.
- Read and follow the fetal spiral electrode package guidelines.
If a woman refuses EFM use, the physician or midwife should be informed. Document the patient’s refusal by recording her words in quotation marks.
PLACEMENT OF THE TOCO
Secure the TOCO. Correct placement of the TOCO should detect uterine contractions, not just maternal breathing movements. The TOCO works best when the fetus is close to term. If the fetus is less than 30 weeks of gestation, place the TOCO under the umbilicus (Figure 1.10). Ask the woman whether she has cramps, intermittent bladder pressure, intermittent leg or groin pain, or low backache. These may be indications of preterm labor. Place the TOCO above the umbilicus if the fetus is older than 30 weeks of gestation (Figure 1.11).
1.10
If the fetus is preterm, place the TOCO in the location illustrated at the left.
1.11
If the fetus is near term or 38 or more weeks of gestation, place the TOCO in the location illustrated at the right.
If it is placed too high, it may slide up over the xyphoid process and will need to be moved down to be at or slightly below the uterine fundus.
ASSESS THE CERVIX
Defer cervical examinations when bleeding is present until you know the location of the placenta—avoid a vaginal examination if there is placenta previa. If membranes rupture preterm, the cervix may be examined visually using a sterile speculum by a skilled healthcare provider. This prevents introduction of bacteria, which can stimulate prostaglandin release, contractions, or cause an infection.
During cervical examination, the nurse should assess the following:
- Location: Locate the cervical os. Is it posterior, in a midposition, or anterior?
- Dilatation: Estimate the size of the opening of the cervix in centimeters using your index and middle fingers. If only one fingertip fits inside, it is “FT” or fingertip dilated. This is equivalent to 1 cm. If the cervix is open more than 9 cm but less than 10 cm, a “rim” is present. If only the top of the cervix remains, an anterior lip (“ant. lip”) is documented. Document dilatation in the medical record following each exam.
- Effacement: How thin is the cervix? At term, the cervix is approximately 2.5 to 3 cm long. It may be firm or soft. Effacement occurs when the cervix is soft. It is estimated as the percent that has thinned; for example, 70% effaced means only 30% remains. Document the percentage of cervical effacement in the medical record following each exam.
- Presentation: Is it vertex, breech, or other (e.g., face, brow, shoulder)? Is there caput or molding? Document the presence of caput and/or molding (and the extent of caput and molding, especially if it is more than a few millimeters [mm] of caput or you feel overriding sutures), and the fetal position and any other findings in the medical record following each exam. If there is more than a few millimeters of caput or overriding sutures, that is abnormal.
- During the vaginal examination, palpate for the umbilical cord or a compound presentation. A compound presentation may include the fetal head and hand as presenting parts. Document the presenting part, for example, vertex. If there is a compound presentation, notify the certified nurse midwife and/or the obstetric physician.
- Station: Determine the level of the presenting part above or below the pelvic ischial spines. When the tip of the baby’s skull (not the caput) is at the level of the ischial spines, that is zero (0) station. Use centimeters: −1, −2, −3, ballottable (above the spines), +1, +2, +3, +4, +5 (below the spines). Document the centimeters above or below the ischial spines (station) following each exam.
SUMMARY
A systematic review includes collection of maternal and fetal data and determination of risk factors. Determine the presence of fetal well-being and/or threats to fetal well-being. When continuous monitoring is needed but membranes are intact, the Novii Wireless Patch System may be an option for continuous monitoring. It is essential to create an evidence-based plan of care that optimizes maternal and fetal safety.
Conclusion
Completing the Examination
Palpate the ankles for oedema and test for hyperreflexia (pre-eclampsia)
Thank the patient and allow them to dress in private
Wash your hands
Summarise findings
Perform:
Blood pressure
Urine dipstick
OpenLearn Create
Antenatal Care
Antenatal Care
At every antenatal visit you should assess all pregnant women for signs and symptoms of poor nutrition or iodine deficiency, including pallor, lack of energy and goitre.
Most women gain 9-12 kg during a normal pregnancy, but weight gain is not a reliable indicator of pregnancy outcome. Sudden weight gain near the end of pregnancy is a warning of possible pre-eclampsia and the woman should be referred to a health centre.
Fever (a temperature of above 37.5°C) should be treated initially with fluids, paracetamol and cold sponging. Refer a pregnant woman to a health centre if her temperature stays high. She needs to be screened for infections such as malaria.
If the pulse rate rises above 100 beats per minute, it is a sign of ill health and the woman needs referral to a health centre.
Signs and symptoms of anaemia include pallor, tiredness, fast pulse and shortness of breath. Refer pregnant women with these characteristics.
Shortness of breath is usual near the end of pregnancy as the growing baby crowds the mother’s lungs. Refer her if it causes major discomfort.
If the blood pressure of a pregnant woman reaches 140/90 mmHg or higher, she has hypertension. All hypertension in pregnancy is a serious illness, which requires immediate referral to a health centre.
Abnormal vaginal discharge, itching or swelling of the external genitalia, and burning or pain when urinating or during sex, are symptoms of vaginal infection, and the woman should be referred.
References
1. https://www.msdmanuals.com/professional/gynecology-and-obstetrics/approach-to-the-pregnant-woman-and-prenatal-care/evaluation-of-the-obstetric-patient
2. https://geekymedics.com/obstetric-abdominal-examination/
3. https://teachmeobgyn.com/history-taking-examinations/examinations/obstetric/
4. https://www.ncbi.nlm.nih.gov/books/NBK560814/
5. https://emedicine.medscape.com/article/262591-overview
|
|
|
© helpiks.su При использовании или копировании материалов прямая ссылка на сайт обязательна.
|