- Автоматизация
- Антропология
- Археология
- Архитектура
- Биология
- Ботаника
- Бухгалтерия
- Военная наука
- Генетика
- География
- Геология
- Демография
- Деревообработка
- Журналистика
- Зоология
- Изобретательство
- Информатика
- Искусство
- История
- Кинематография
- Компьютеризация
- Косметика
- Кулинария
- Культура
- Лексикология
- Лингвистика
- Литература
- Логика
- Маркетинг
- Математика
- Материаловедение
- Медицина
- Менеджмент
- Металлургия
- Метрология
- Механика
- Музыка
- Науковедение
- Образование
- Охрана Труда
- Педагогика
- Полиграфия
- Политология
- Право
- Предпринимательство
- Приборостроение
- Программирование
- Производство
- Промышленность
- Психология
- Радиосвязь
- Религия
- Риторика
- Социология
- Спорт
- Стандартизация
- Статистика
- Строительство
- Технологии
- Торговля
- Транспорт
- Фармакология
- Физика
- Физиология
- Философия
- Финансы
- Химия
- Хозяйство
- Черчение
- Экология
- Экономика
- Электроника
- Электротехника
- Энергетика
SUPPLIES. ABBREVIATIONS. PATTERN INSTRUCTIONS
SUPPLIES
· Crochethook H/5. 00mm
· Safetyeyes 6mm
· Yarn needle (I use Clover Chibi Bent Tip Needle Set )
· Thickplasticstraw (optional)
· Woodenchopsticks (optional)
· Cardboard (optional)
· Fiberfill forstuffing
· Stitchmarker (optional)
· Any worsted weight yarn in three colors, I used the following in my sample:
· RedHeartSuperSaver, Pumpkin
· LionBrandVanna’sChoice, Fern
· Loops& ThreadsImpeccable, Chocolate
· RedHeartSoft, Wheat
NOTES
· The ‘branches’ are supported by wooden chopsticks – Chinese takeout chopsticks work great!
· The tree trunk is supported by the thick plastic straw – grab an extra one of these at any Bubble Tea shops!
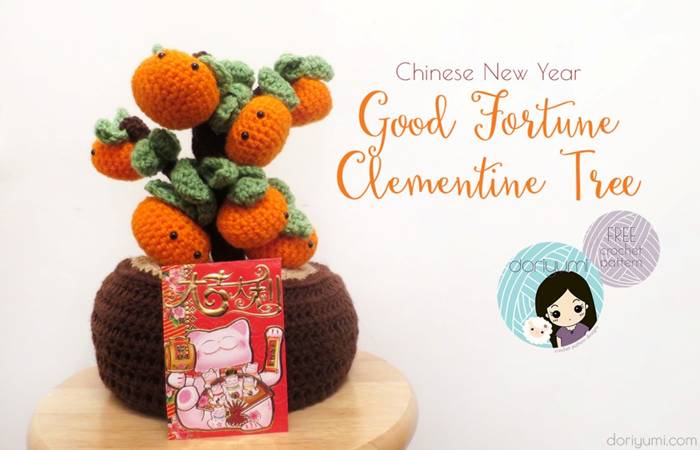
· The clementine tree measures approx. 5. 75″ inheight.
· Do not join or turn unless stated.
· Gauge is not essential – just keep your tension consistent throughout.
ABBREVIATIONS
ch = chain
sc = single crochet
sc2tog = single crochet 2 together / sc decrease
hdc = half double crochet
dc = double crochet
dc2tog = double crochet 2 stitches together
BLO = back loop only
slst = slip stitch
st(s) = stitch(es)
rep = repeat
* – * = repeat instructions between asterisks as many times as directed
PATTERN INSTRUCTIONS
Clementine (make 8)
Follow my Chinese New Year Clementine Amigurumi pattern > > HERE< <.
Make as many clementines as you’d like. I made 8 because it is a lucky number in the Chinese culture.
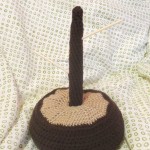
Pot
With brown yarn, start with a magic ring, ch 1 to secure ring.
Round 1: 6 dc in magic ring (6)
Round 2: Ch 2, dc in same st, 2 dc in each st around (12)
Round 3: Ch 2, dc in same st, dc in next st, *2 dc in next st, dc in next st*, rep * – * around (18)
Round 4: Ch 2, dc in same st, dc in next 2 sts, *2 dc in next st, dc in next 2 sts*, rep * – * around (24)
Round 5: Ch 2, dc in same st, dc in next 3 sts, *2 sc in next st, sc in next 3 sts*, rep * – * around (30)
Round 6: Ch 2, dc in same st, dc in next 4 sts, *2 sc in next st, sc in next 4 sts*, rep * – * around (36)
Round 7: Ch 2, dc in same st, dc in next 5 sts, *2 sc in next st, sc in next 5 sts*, rep * – * around (42)
Round 8: Ch 1, BLO, sc in each st around (42)
Round 9: Ch 2, dc in same st, dc in next 6 sts, *2 dc in next st, dc in next 6 sts*, rep * – * around (48)
Round 10: Ch 2, dc in same st, dc in next 7 sts, *2 dc in next st, dc in next 7 sts*, rep * – * around (54)
Round 11: Ch 2, dc in same st, dc in next 8 sts, *2 dc in next st, dc in next 8 sts*, rep * – * around (60)
Round 12: Ch 2, dc in same st, dc in next 9 sts, *2 dc in next st, dc in next 9 sts*, rep * – * around (66)
Round 13: Ch 2, *dc2tog, dc in next 8 sts*, rep * – * around (60)
Round 14: Ch 2, *dc2tog, dc in next 7 sts*, rep * – * around (54)
Round 15: Ch 2, *dc2tog, dc in next 6 sts*, rep * – * around (48)
Round 16: Ch 1, BLO, sc in each st around (48)
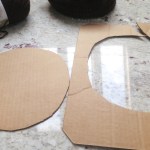
Now, we will cut a circular shape from cardboard to give the pot a better shape. You can certainly skip this step if you’d like and just stuff the pot with fiberfill. If using cardboard (cereal boxes work great! ), simply trace the bottom of the pot on to the cardboard, cut out shape, trim if necessary and insert it at the bottom of the pot. Then, stuffwithfiberfill.
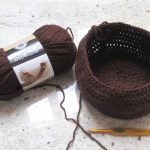
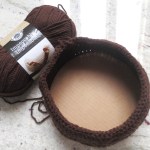
Change to tan color yarn.
Round 17: Ch 1, sc in each st around (48)
Round 18: Ch 1, *sc2tog, sc in next 6 sts*, rep * – * around (42)
Round 19: Ch 1, *sc2tog, sc in next 5 sts*, rep * – * around (36)
Round 20: Ch 1, *sc2tog, sc in next 4 sts*, rep * – * around (30)
Round 21: Ch 1, *sc2tog, sc in next 3 sts*, rep * – * around (24)
Round 22: Ch 1, *sc2tog, sc in next 2 sts*, rep * – * around (18)
Round 23: Ch 1, *sc2tog, sc in next st*, rep * – * around (12)
Round 24: Ch 1, sc2tog around (6)
Change to brown color yarn and work on the tree trunk.
Tree Trunk
Round 1: BLO, sc in each st around (6)
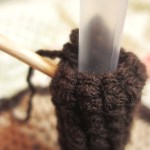
(optional – thick straw method) Insert a thick straw and single crochet around the straw to give it a better shape. As you work single crochets around the straw, keep in mind you will need to poke 2 holes on the straw to hold the chopsticks. 1 towards the bottom, 1 towards the top. When I get to the point where I would like the first ‘branch’ to stick out, I cut a tiny hole using scissors and poke the chopstick across. Then, trim the chopstick to the length desired. Repeat for second ‘branch’.


(stuffing only method) Alternatively, stuff trunk with poly-fil as you go. You will then create the branches separately and sew on to the trunk.
Rounds 2-20: Working in both loops again, sc in each st around (6)
Add or subtract rounds to adjust the height of the trunk to your liking.
Round 21: sc2tog, 1 sc, sc2tog, 1 sc (4)
Round 22: 1 sc in each st around (4)
Round 23: 1 sc, sc2tog, 1 sc (3)
Round 24: 1 sc, sc2tog (2)
Round 25: sc2tog (1)
Slst in next st. Fasten off and weave in ends.
|
|
|
© helpiks.su При использовании или копировании материалов прямая ссылка на сайт обязательна.
|