- Автоматизация
- Антропология
- Археология
- Архитектура
- Биология
- Ботаника
- Бухгалтерия
- Военная наука
- Генетика
- География
- Геология
- Демография
- Деревообработка
- Журналистика
- Зоология
- Изобретательство
- Информатика
- Искусство
- История
- Кинематография
- Компьютеризация
- Косметика
- Кулинария
- Культура
- Лексикология
- Лингвистика
- Литература
- Логика
- Маркетинг
- Математика
- Материаловедение
- Медицина
- Менеджмент
- Металлургия
- Метрология
- Механика
- Музыка
- Науковедение
- Образование
- Охрана Труда
- Педагогика
- Полиграфия
- Политология
- Право
- Предпринимательство
- Приборостроение
- Программирование
- Производство
- Промышленность
- Психология
- Радиосвязь
- Религия
- Риторика
- Социология
- Спорт
- Стандартизация
- Статистика
- Строительство
- Технологии
- Торговля
- Транспорт
- Фармакология
- Физика
- Физиология
- Философия
- Финансы
- Химия
- Хозяйство
- Черчение
- Экология
- Экономика
- Электроника
- Электротехника
- Энергетика
5 Bow Braid
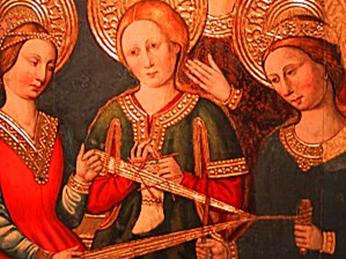
| Beginning fingerloop braiding Philippa Montague (mka Erika Hepler) philippa@cardinal-creations. com Fingerloop braiding is the method of creating a braid using loops of string, held on the fingers of both hands and passed from one hand to the other to create a pattern. The resulting braid could be used as a lace, for fastening, or as trim. This does not create “lace” such as that created by bobbin lace, but rather a braided cord. This handout will provide an overview and instructions for a few basic cords. The reader is encouraged to continue their study by examining some of the references included at the end of this document. | 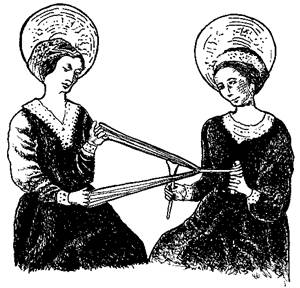 One braider and helper pictured in 1465 CE, from the Spanish altar
piece " Historia de la Virgen Maria, " attributed to Nicolas de Zahortiga One braider and helper pictured in 1465 CE, from the Spanish altar
piece " Historia de la Virgen Maria, " attributed to Nicolas de Zahortiga
|
A lace made of fingerloop braid has many uses. A long lace can be used to lace clothing shut, such as women’s kirtles or men’s doublets. Smaller laces with metal aiglets on the ends are called points, which were used to tie men’s hose to their doublets. Braids can be threaded through casings at the wrists of a smock or on the top edge of a drawstring purse. It can also be used as trim, especially wider braids and more complex patterns.
Fingerloop braiding was found throughout Europe and Asia from the 8th to the 19th centuries. There are several images showing individuals doing fingerloop braiding. These examples show two or three individuals working together, with one person holding the loops and another tightening up the strings as they are braided.
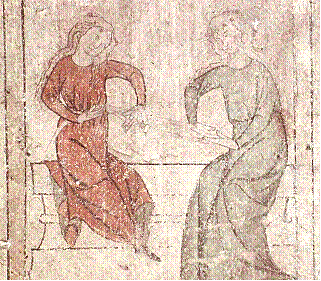 Mural from the Kanonikerhaus in Constance, Germany, c. 1320.
|  Altarpiece with the Life of the Virgin by Nicolá s and Martí n Zahortiga,
c. 1460.
Altarpiece with the Life of the Virgin by Nicolá s and Martí n Zahortiga,
c. 1460.
|
There are some extant braids that have been found in archeological digs in London. Virtually all of these are made of silk. Certainly linen and wool would have also been used, but these have not survived. Many of the braids are narrow, which could have been worked by a single person. However, others were constructed of 10 or more loops, which would have required more than one person to coordinate the braiding. 1 There are also some items such as purses that have survived, and show fingerloop braids as part of their design.
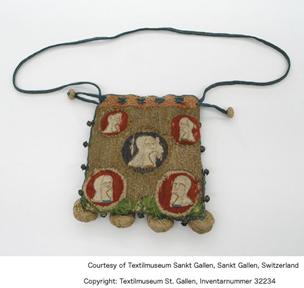 Extant purse in Textilmuseum Sankt Gallen (Switzerland) with fingerloop braided drawstring and strap, 15th century.
Retrieved from http: //www. lmbric. net/n10/n10. html
Extant purse in Textilmuseum Sankt Gallen (Switzerland) with fingerloop braided drawstring and strap, 15th century.
Retrieved from http: //www. lmbric. net/n10/n10. html
|
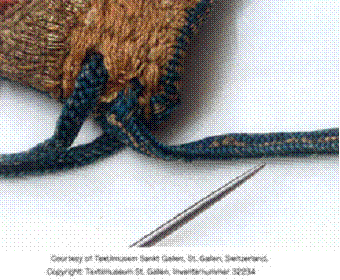 Detail of extant purse in Textilmuseum Sankt Gallen (Switzerland)
with fingerloop braided drawstring and strap, 15th century.
Detail of extant purse in Textilmuseum Sankt Gallen (Switzerland)
with fingerloop braided drawstring and strap, 15th century.
|
There are a few instructional books on braiding that have also survived. For many years they remained unknown, since the instructions described therein contained shorthand descriptions of the steps that were not easily interpreted. However, the instructions have been decoded and made available for us all to study. One example, known as Harley 2320 2, dates from the late 1400s and it includes instructions, written in Middle English, for one and two person fingerloop braids. Another dates from the early 17th century and is called Pursestrings 3. This handwritten document contains directions as well as examples in silk fiber stitched into the pages. We are fortunate that these primary resources have been interpreted and distributed in modern format such as a book named Tak V bowes departed 4, which reproduces and interprets the instructions in Harley 2320, as well as The Compleat Anachronist #108 5, which incorporates drawings and instructions from both Harley 2320 and Pursestrings, as well as a contemporary copy of Pursestrings.
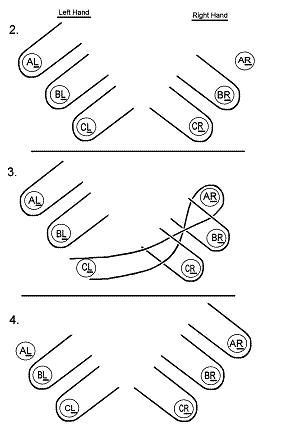
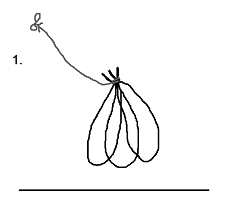 3 Bow Braid
The easiest braid to learn is probably the 3 bow braid.
Preparation:
1. Cut 3 strings of equal length, around 2 feet long.
Fold each in half and lay them next to each other.
Tie the loose ends together in an overhand knot.
Take another piece of string, tie it to the knot and
to a fixed object such as a chair.
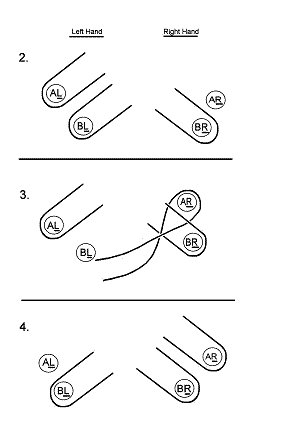 2. With your hands slightly cupped, palms facing towards
you and fingers towards the center, place a loop onto
the index (AL) and middle (BL) fingers of your left hand,
and on middle (BR) finger of your right hand.
Braiding:
3. Using your right index (AR) finger, go through the loop on your right middle (BR) finger.
Bring your finger below and behind the bottom of the loop that is on your left middle (BL) finger. Pull it through and onto the right index (AR) finger.
You may want to use your right thumb to help. It should twist as it is pulled through (this is call Reversed).
4. Move the loop on your left index (AL) finger down to
Your left middle (BL) finger. This is called Walking Down.
5. Pull your hands apart to tighten up the weave near the knot.
You have now completed half of the braid repeat.
Now, do the same with your left hand, pulling the loop on
your right middle (BR) finger onto your left index (AL) finger, reversed. Walk the loop from your right index (AR) finger down to your right middle (BR) finger. Tighten the braid by pulling your hands apart.
Now, repeat this back and forth, and the pattern will begin
to take shape.
Изображение
5 Bow Braid
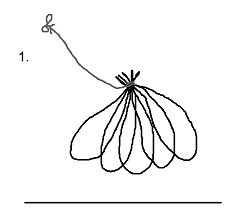
The next logical braid to learn is the 5 bow braid.
Preparation:
1. Cut 5 strings of equal length, around 2 feet long.
Fold each in half and lay them next to each other.
Tie the loose ends together in an overhand knot.
Take another piece of string, tie it to the knot and
to a fixed object such as a chair.
 2. With your hands slightly cupped, palms facing towards
you and fingers towards the center, place a loop onto
the index (AL), middle (BL) and ring (CL) fingers of your left hand, and on middle (BR) and ring (CR) fingers of your right hand.
Braiding:
3. Using your right index (AR) finger, go through the loops
on your right middle (BR) and right ring (CR) finger.
Bring your finger below and behind the bottom of the loop that is on your left ring (CL) finger. Pull it through and onto the right index (AR) finger.
You may want to use your right thumb to help. It should
twist as it is pulled through (this is call Reversed).
4. Move the loop on your left middle (BL) finger down to
your left ring (CL) finger, and move the loop from your left index (AL) finger down to your left middle (BL) finger. This is called Walking Down.
5. Pull your hands apart to tighten up the weave near the knot.
You have now completed half of the braid repeat.
Now, do the same with your left hand, pulling the loop on
your right ring (CR) finger onto your left index (AL) finger,
reversed. Walk the loop from your right middle (BR) finger
down to your right ring (CR) finger, and from your right
index (AR) finger down to your right middle (BR) finger.
Tighten the braid by pulling your hands apart.
Now, repeat this back and forth, and the pattern will begin
to take shape.
You now have the basic knowledge to recreate many fingerloop braiding patterns.
Some variations will have you pull the loops through without reversing them. This is call Unreversed. A pattern with all Reversed pulls will tend to be round or square. A pattern that alternates Reversed and Unreversed pulls will tend to be flat. If it uses only Unreversed pulls, you will create two smaller braids, which can be used for a section between other solid patterns to create a loop or hole.
I have purposefully used the notations of calling your fingers A, B and C, with the identifier of L for the left hand and R for the right hand. This is the notation that is used in the directions by Lois Swales and Zoe Kuhn Williams in the Compleat Anachronist brochure on fingerloop braiding 5 which can also be found online at www. fingerloop. org.
I suggested that you start with short strings, about 2 feet long. Folded, this gives you 1 foot loops, which then lose length as the thickness of the braid takes shape. Using thin strings, your finished braid will be about 1/3 the original cut length of the strings. Thicker yarn will likely result in shorter finished braids.
It is important to maintain consistent tension throughout the length of the braid so that it is not loose in one spot and very tight in another. This takes practice. The earliest section will require you to pull your hands wide apart to create the tension. As the loops get smaller and smaller, it is easy to overtighten and create too much tension. So, be aware of trying to counteract this tendency as you go. If you want to create a long braid to use for lacing, you will likely need a friend to help you tension the braid in the early sections. This is what the second person is doing in the period illustrations above.
Note that this is not a craft that can be easily set down and picked up again as time permits. If you let go of the strings, your pattern will almost assuredly get lost. It is possible to create a stand of fingers where you can rest the unfinished braid (some people recommend a wide-toothed comb), but unless you have one of these (or a friend willing to hold your loops while you go do something else) you are advised to plan to start and finish a braid in one sitting. It will go faster as you practice, so that you can create a rather long braid in under half an hour.
I encourage you to try variations on these simple braids – multiple colors, different types of materials – as well as to research and find more complex braids to try. Fingerloop braiding is a fun and easy craft that adds significantly to your SCA projects.
|
|
|
© helpiks.su При использовании или копировании материалов прямая ссылка на сайт обязательна.
|