- Автоматизация
- Антропология
- Археология
- Архитектура
- Биология
- Ботаника
- Бухгалтерия
- Военная наука
- Генетика
- География
- Геология
- Демография
- Деревообработка
- Журналистика
- Зоология
- Изобретательство
- Информатика
- Искусство
- История
- Кинематография
- Компьютеризация
- Косметика
- Кулинария
- Культура
- Лексикология
- Лингвистика
- Литература
- Логика
- Маркетинг
- Математика
- Материаловедение
- Медицина
- Менеджмент
- Металлургия
- Метрология
- Механика
- Музыка
- Науковедение
- Образование
- Охрана Труда
- Педагогика
- Полиграфия
- Политология
- Право
- Предпринимательство
- Приборостроение
- Программирование
- Производство
- Промышленность
- Психология
- Радиосвязь
- Религия
- Риторика
- Социология
- Спорт
- Стандартизация
- Статистика
- Строительство
- Технологии
- Торговля
- Транспорт
- Фармакология
- Физика
- Физиология
- Философия
- Финансы
- Химия
- Хозяйство
- Черчение
- Экология
- Экономика
- Электроника
- Электротехника
- Энергетика
Finishing instructions
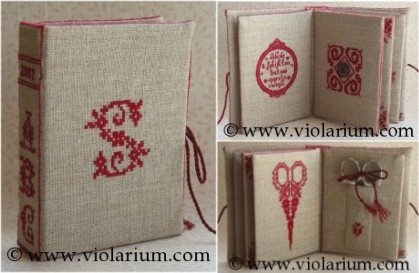
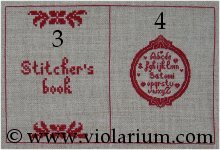
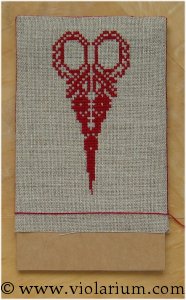
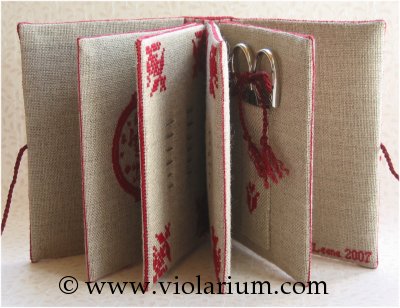
Stitcher's book is a book made of fabric and decorated with cross stitches. It can be used to keep your scissors and needles or other stitching accessories. It would also be a wonderful gift for a stitching friend!
The original idea is French, but as there are no instructions available, we made our own instructions to help in getting started! You can choose the designs to stitch as well as the size of the book and the number of pages. All the numbers given here are an example only, based on the book in the photos.
|
Even though stitching a Stitcher's book may take some time, it's very easy to finish! Back stitches are sewn around all the pages and covers. Then the pages are sewed and attached to the cover. There's cardboard inside the pages and covers to make them firm.
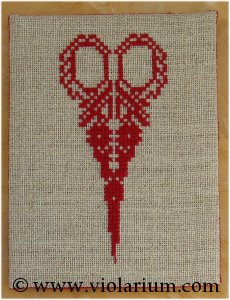
The designs in this book can be found in different De fil en aiguille magazines, as well as Isa Vautier's book Un petit fil rouge m'a dit... We've prepared a detailed list of the designs used, if you want to know where to find the designs. The book was stitched on 30 count natural linen fabric, over two fabric threads with two strands of DMC 815.
Finishing instructions
Below you'll find instructions for finishing a Stitcher's book. Please note, that it is prohibited to copy or download or distribute these photos or instructions without our permission. Of course you are welcome to share the link to these pages! If you have any questions about the instructions, please send us an e-mail and we will be happy to help!
1. You can stitch the book on any cross stitch fabric, aida or linen. The size of the finished book depends on the fabric and the size of the pages you choose to stitch. If you stitch on linen, you can stitch the designs over one or two fabric threads.
|
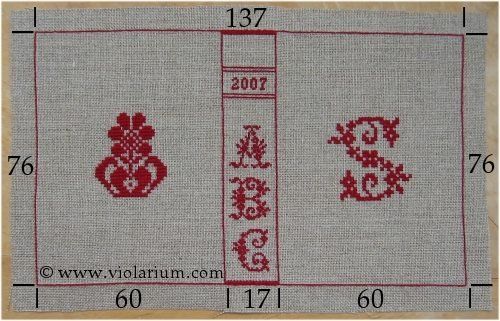
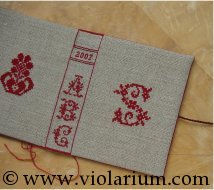
The size of the front cover of the book is approximately 11 x 13 cm (4.3" x 5.1"). In the photo above you'll see the dimensions of the book cover in stitches, stitched over two fabric threads. We have also pictures of other dimensions of this book, if you want to take a look.
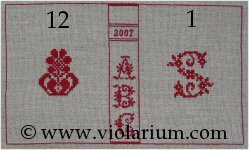
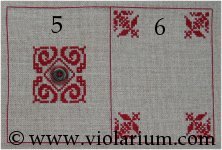
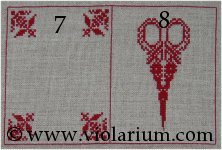
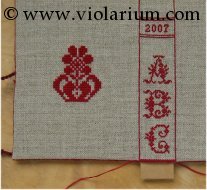
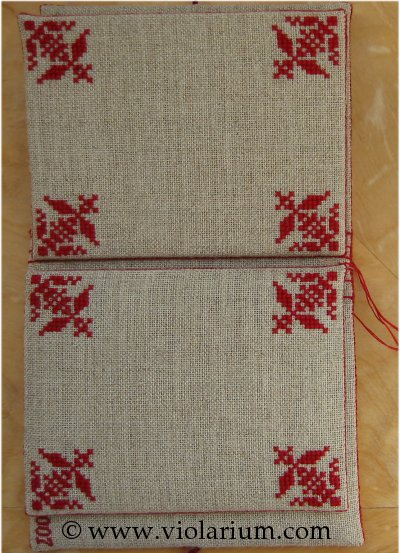
2. Below you'll see photos of all the pieces stitched for this book. The pages are numbered so that the front cover is the page number 1 and the back cover number 12. Back stitches are stitched around every page. It is better to stitch all the back stitches first and only then the designs inside. Make sure that you have the same amount of back stitches around each page.
If you want to see how the pages look like in the finished book, you'll find photos of each page in the Photo gallery.
| 
|
| 
|
| 
|
3. When you've finished stitching all the pieces, trim the edges, approximately 1 cm (1/3"-1/2") from the back stitching. Start sewing pages like in the photo below.

|
Fold the page following the back stitched line in the middle, reverse side facing inwards. Close the upper (or lower) part and the side. When sewing, pass the needle under the back stitches. Don't pierce the fabric, but always pass the needle under the back stitch like in the photo.
Leave the lower (or upper) part open and insert a piece of cardboard inside the page. You can use any cardboard, as thick or thin as you like. Using cardboard makes pages firm. Sew the last side of the page. Sew all pages like this.
| 
|
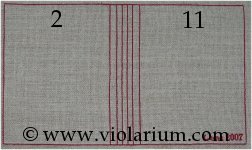
4. Sew the inside and outside covers together (pages 1/12 and 2/11), reverse sides facing inwards. Leave an opening to the lower side. Cardboards will be inserted there. When sewing the short sides, sew cords or ribbons (to close the book) at the same time. Insert three separate pieces of cardboard in between the covers. One to the front cover, one to the back cover and one narrow piece to the back of the book (take a look at the photo below). Close the opening.
Please note! It might be easier to attach the pages to the cover if the third, narrow piece of cardboard is not yet in place. You may want to leave the narrow part of the back of the book open and NOT insert the third piece of cardboard until you've attached the pages of the book.
| 
|
5. Sew couple of tiny stitches to the back of the book, following the back stitched lines. This will hold the three cardboard pieces in place.

|
6. Attach the pages to the back stitched lines in the inside cover, between pages 2 and 11. Don't pierce the fabric, but always pass the needle under the back stitches, like when sewing the pages.
|
6. Voila! It's finished.
|
|
|
|
© helpiks.su При использовании или копировании материалов прямая ссылка на сайт обязательна.
|